I'm back, With some tips!
Well, These past few years have been a real treat havent they?
I am so excited to finally return to work full time, and when I was approached by Redfin Realty to help them out with their new blog, I was thrilled!
Every makeup enthusiast knows how important it is to have a special place in your home to apply and store your makeup. However, creating a beauty area that is organized and stylish can be challenging – especially if you’re low on space. The good news is, there are many ways to create a makeup room in your home that don’t require a lot of space.
To help you get started, Redfin reached out to makeup and beauty experts from New York, NY, to Los Angeles, CA, including us, to share our best small makeup room ideas. Check out my tip on Small Makeup Room Ideas to Incorporate in Your Home.
10 Basic rules of sanitation for every makeup artist.

70% Alcohol, the best type of alcohol for disinfecting.
BeautySoClean wipeout brush cleaner - a great antibacterial brush cleanser (they also make amazing cosmetic sanitizing spray)
Lysol disinfecting wipes for wiping down palettes & tools.
Years ago when I decided I wanted to become a makeup artist, one of the last things I thought about was sanitation. At one point I was under the impression that as long as I had a bunch of makeup, and watched some youtube videos that I would be more than capable.
Boy was I wrong.
After a few short months of researching, I realized I was missing a huge piece of the puzzle - Sanitation. Luckily I hadn't graced any clients with my talents at that point yet so, fear not, no faces were harmed in the making of my career.
There are a lot of myths and miscommunications out there about what is and is not appropriate to use on your clients, and how to go about using certain items. With the help of a few other local artists I have created this list of things to think about when you are beginning your career as a makeup artist.
1- BEAUTY BLENDERS! it is physically impossible to clean a beauty blender properly, and therefore using and reusing them on several clients is a huge risk to their health. How is that possible you ask? well consider some science for a second; bacteria only grows in a moist environment, and what is your beauty blender? a moist environment, that's what! even after cleaning it, its still wet, meaning that while it is sitting there to dry all the bacteria and germs that were missed are just getting sucked into the middle of the sponge, waiting for the next victim. Not to mention, here in Canada if you look up Health Canada's guidelines on spa tools, sponges are listed as disposable meaning you have to throw them out because its the law. There is absolutely NO REASON to use a beauty blender on several different clients, when there are so many other non latex sponge options for you out there that are disposable, and more affordable.
2- Brushes, they MUST be cleaned and disinfected between each client using an antibacterial brush cleanser. For tips on how to clean your brushes, see my last blog post "brush cleaning 101"
3- Disposables. You NEED to use them, this is no option or opinion. Lip wands have to be used for lip glosses or liquid lipsticks and mascara wands for mascara (obviously). That being said, you need to use a DIFFERENT disposable each time you dip in. Just because its disposable doesn't mean you can double dip.
4- 99% alcohol is ineffective. All makeup artists should be using 70% alcohol. This is explained by the CDC (center for disease control) very thoroughly. The short version of the story is that 99% alcohol does not have enough water content to properly destroy the bacteria. 70% alcohol is used in hospitals, spas, and various other places where hygiene is of the utmost importance.
5- Eyeliners and lip liners have to be sharpened and disinfected before each and every client, furthermore artists should NOT be using felt/brush tip liquid eyeliners on clients as they are impossible to properly disinfect.
6- Cross contamination & Double dipping. This is one of the main rules of makeup artistry but is often misunderstood. Double dipping is when you take your brush and dip into a cream product, use it on your client, and then dip into the product again. Anything creamy or wet should be scooped out with a palette knife and worked from a metal plate. Cream products are impossible to properly disinfect and this is why they must be scraped out.
7- hands, they are amazing tools to use for makeup artistry, and some of the most highly acclaimed artists use them and produce amazing work, which is fine, but please for the love of god wash them. sanitize them. clean your nails, and avoid having overly long fake nails that collect germs in the crevices. those gems look beautiful but they are full of poo particles, so avoid them if you can.
8- Lashes, never EVER ask your client for lashes back and then use them on another client. I have had more than enough models tell me that this has happened and I cannot in good faith understand who or what is possessing people into thinking that this is even remotely acceptable.
9- Keep your set ups clean, and organized. While you are working you should have full control over which brushes are clean, which brush has been used on which model, and garbage should be fully contained. I like to keep a pop up trash bin with me, or use the other half of my Dany pouch (lined with a doggy poop bag, works great!)
10- The after cleanse. Once your job is done, everything needs to be cleaned. Every single surface - thats right friends! everything! I like to travel with lysol wipes and use them to wipe down the surface of all my palettes, tools, brush handles, and kit bags. I also spray everything with 70% alcohol like its going out of style.

A lot of people may think that this is over reacting, however I want to remind everyone of some of the contagious virus' and bacteria that can be spread by makeup & their crafters:
Staphylococcus Epidermidis
Staphylococcus epidermidis is a form of staph bacteria that has been found on lipsticks, eyeshadows and eyeliners during laboratory testing. While this bacteria often is found naturally on human skin, for those with a compromised immune system--due to a severe illness, old age or a chronic illness--may develop an infection. Some strains of this bacteria are resistant to antibiotic treatment and can severely affect the intestines if left untreated.
Staphylococcus Warneri
Another member of the staphylococcus bacteria group, Staphylococcus warneri also is found on the skin of humans and animals. While it may not cause adverse reactions in those with healthy immune systems, it can cause severe reactions and illness in those with compromised immune systems. In the most extreme cases, this bacteria is associated with endocarditis, which is damage to the heart valves.
Pseudomonas Aeruginosa
Pseudomonas aeruginosa is a common bacteria found in soil, water and on the skin and has been associated with inflammation, rash and in severe cases, sepsis--a serious infection that can cause organ failure. Pseudomonas aeruginosa that live on a mascara wand that can nick the eye or penetrate into the soft tissues or membranes of the eye.
Methicillin-Resistant Staphylococcus Aureus
One of the most serious forms of bacteria, methicillin-resistant Staphylococcus aureus (MRSA), can lurk on old makeup and cause an infection, such as dermatitis or pink eye, that can resist antibiotic treatment. This bacteria is considered very dangerous because the infection can be easily spread. When applying makeup, MRSA present in the makeup can enter a pimple, open cut or the mucous membranes of the eye and nose. Initial signs of infection including redness, inflammation and heat over the infected area. If you suspect you may be infected with MRSA, seek immediate treatment.
(source: Livestrong.com)
And, some of the infections you can get:
conjunctivitis
"MayoClinic.com defines conjunctivitis as an infection of the membrane that lines the eyelid and a portion of the eyeball. More commonly known as pink eye, this condition causes the small blood vessels in the membrane to enlarge. This causes the distinctive pink or red cast that gives this condition its name. Although this condition usually affects children, adults who use cosmetics can develop conjunctivitis if bacteria come in contact with the membrane. To reduce the risk of developing conjunctivitis, avoid sharing cosmetics with others and throw away eye cosmetics if they smell bad." (livestrong.com)
Cold Sores
"Unlike bacterial infections such as pink eye, you cannot get rid of cold sores with medication, since they are caused by the herpes simplex virus. Usually appearing as small, fluid-filled bumps on the skin near the mouth and lips, cold sores can appear up to 20 days after you are exposed to a person carrying the herpes simplex virus [source: Mayo Clinic]."
Keratitis
"Microbial keratitis, also known as a corneal infection, occurs when bacteria come in contact with the cornea. The cornea covers the pupil and iris of the eye and has a domed shape. This condition usually occurs when bacteria contaminate contact lenses. If you put contact lenses in after using makeup, the bacteria in the makeup may contaminate one or both of your lenses. This allows the bacteria to attack the cornea, causing eye drainage, decreased vision, puffy eyelids and light sensitivity. Visit an ophthalmologist if you experience these symptoms, as keratitis may lead to blindness if not treated properly." (livestrong.com)
Stye
"The University of Michigan Kellogg Eye Center defines a stye as a small lump in the eyelid. This lump appears when chronic inflammation affects the meibomian glands, which produce oil. Usually, styes form as the result of trapped oil, but infection can also cause a stye. The glands can trap bacteria from cosmetic products, leading to inflammation and tenderness. Treatments for a stye include warm compresses, antibiotic drops, steroid drops, steroid injections and surgical drainage." (livestrong.com)
Blepharitis
"Blepharitis, or an infection of the eyelid, can occur as the result of a bacterial infection. If staphylococcus bacteria contaminate a cosmetic product, use of the product transfers the bacteria to the eye and increases the risk of blepharitis. Blepharitis causes light sensitivity, blurred vision, eye discharge, pain and redness of the eye. If the bacteria enter the meiobian glands, recurrent conjunctivitis may also occur." (livestrong.com)
Impetigo
"impetigo is a common and highly contagious skin infection that mainly affects infants and children. Impetigo usually appears as red sores on the face, especially around a child's nose and mouth, and on hands and feet. The sores burst and develop honey-colored crusts.Treatment with antibiotics is generally recommended to help prevent the spread of impetigo to others. It's important to keep your child home from school or day care until he or she is no longer contagious — usually 24 hours after you begin antibiotic treatment[source: Mayo Clinic]."

Metal plate and palette knife - a must have for every artist!
Sounds pretty nasty right? While this post is not meant to cause any alarm, I do want to stress the importance of taking your clients health into the utmost consideration. Makeup Artistry is more than just slapping some colours onto a canvas, its about creating a lasting relationship with your client - finding out what they like, who they are as a person, and finding a way to accent that natural inner beauty. As makeup artists we need to come together as a team, and work together to lift each other up. If you have any questions about this post please comment below!
BTS - Get the "No Makeup Look"
I get a lot of requests from people to go through and explain how I achieve certain looks, today we are going to explore one of my first ever photoshoots and go through each step of how this look was accomplished.

Model: Devon Simone Photographer: Upma Dhanda
Prepping the skin is one of the most important steps for achieving a flawless canvas.
Skin prep steps for this look are:
- Dermalogica pre-cleanse
- Dermalogica Calming Cleanser
- Dermalogica Toner
- Embryolisse Lait Creme Concentrate.
Foundation is normally my first step after prepping the skin, lots of people like to go straight into eyes but I prefer to work on the complexion first.
For this flawless skin I used:
- Cover FX mattifying primer
- Temptu SB airbrush foundation (through Iwata eclipse airbrush)
- Kryolan Dermacolour concealer stippled on with a duo fiber brush and blended with a sponge.
- To set the foundation I used RCMA no colour powder on a velour powder puff, using a press and roll motion. I then used a clean fluffy brush to ensure there was no leftover powder.
My next step is contour, blush and highlight
- For contouring, I used a shade that came in my kit from school (C|MU school of makeup art & design), and I am almost positive that they use Jordane cosmetics to create the school palettes. The colour is a light taupe, which I find gives a better, more subtle contouring in comparison to some of the more bronze or golden shades that are on the market.
- For blush I used a fluffy brush to apply a light pink shade from La Femme.
- Soft highlighting was achieved by using Soft & Gentle by MAC with a very soft hand.
- After applying all three products to the cheeks, I took a clean 139 brush by MAC (which is a tapered face brush) and blended all three products together.
For eyes, its important not to overthink it.
- I started by using an eyeshadow primer (shadow insurance by Too Faced)
- Then, using a 217 brush from MAC i took a light beige shade from INGLOT and applied it to the lid and on the brow bone.
- Using the same brush I took a taupe shade from INGLOT (very close to the same shade I used to contour the cheeks) and gently applied it to the outer crease.
- Taking a small angled brush, I applied a buried liner with a black eyeshadow (Abyss from Yaby) very close to the lash line.
- Using a disposable mascara wand (from the blur room, the wands they sell are fantastic!) I used the Jordane tube mascara and asked the client to look down at her knees for a perfect application. I highly recommend this mascara as it comes out of a squeeze tube & completely eliminates any opportunity for double dipping.
- For false lashes I applied Demi Wispies from Ardell to the outer corner of the eye.
For the perfect neutral lip;
- I started by lining the lips with my favourite nude liner - Cameo by Face Atelier.
- I then scooped out some lip colour from my palette and mixed the colours together on my steel plate. (MAC Twig & Styled in sepia)
- Using a lip brush I applied the mixture to the lips and blended the colour into the lip liner.
Brows were my last step, for natural looks I prefer to keep them simple
- I applied a brow pencil from my school kit (I believe made by Jordane) In the colour " Dark taupe" to the tail of the brow and in any sparse areas.
- Taking a clean angled brush, I then carved the shape into the brow by pushing the colour into place.
- Using a clean mascara spoolie, I brushed the hairs of the brow and cleaned up any extra product.
And that's it! Seems pretty straight forward but sometimes these looks can be quite the challenge!!
Comment below with your favourite "no makeup" makeup look!
Brush cleaning 101
If you are a makeup artist, one of the most important things you can do is keep your brushes clean and sanitized. Having clean brushes is more than just an aesthetic, you can seriously infect someone with staph or the herpes virus by simply not cleaning your brushes properly, or thoroughly.
there are different methods to cleaning brushes, and different circumstances where each method comes into play. I'm going to break down each method, and explain the anatomy of the brush itself.
The brush:
Your makeup brushes are one of the biggest investments you can make for your kit, and when properly taken care of you can keep your brushes in your kit for upwards of ten years. There are 3 main sections to your brush.
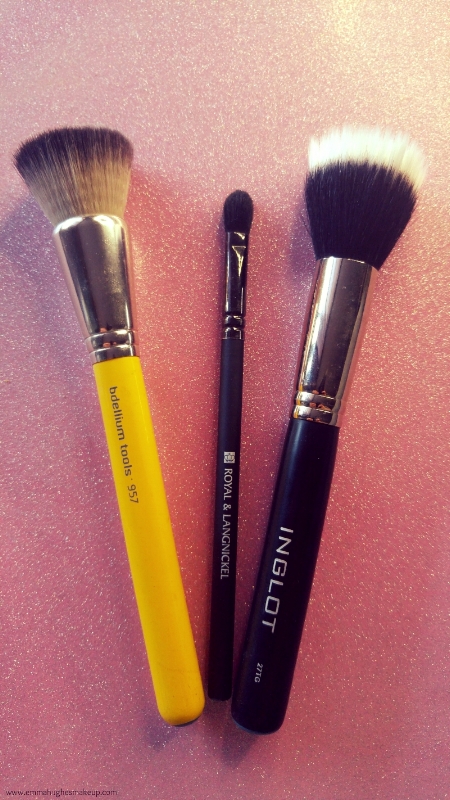
1- the handle. The construction of the handle can be a very important decision in your choice of which brush to purchase. There are many different types and materials that handles are made out of, like plastic, wood, and metal. And each type also has a coating on top. Plastic handles generally have a varnish or rubberized handle which can be very comfortable to hold, however keep in mind that most rubberized finishes wrinkle and peel when exposed to alcohol. Wooden handles are quite often dipped in a lacquer finish and can be quite sturdy. A con to the wooden handle is that its quite common for it to come loose from the ferrule over time. Metal handles are one of my favourites as they are easy to clean, however they are hard to come by. Some of my favourites are by Bdellium Tools.
2- the ferrule. The ferrule is the metal part that attaches to the handle and houses the end of the bristles and where all that gooey glue lives. Its most important when you are washing your brushes to avoid getting water into the ferrule as it can rust over time and lead to shedding and bacteria.
3- the bristles. In the best quality brushes, the bristles are hand layered into the ferrule and pressed into shape, sometimes with the help of small string & a bit of glue. In more commercial brushes, or mass produced brushes, The bristles are put into the ferrule by machine & lots of glue. There are lots of different types of bristles or hair, it can be synthetic, natural, a blend of both, or it can be a synthetic that mimics a natural hair like Natrafil. There are pros and cons to each type, personally i love synthetic for blending creams and natural fibers and hairs pick up powders the best in my opinion. Blends of synthetic and natural can be found in many stippling brushes and can be great for applying foundation. Natrafil and synthetic that mimics the control of a natural hair can be a great option for Vegans or anyone looking for an animal cruelty free option in their kit. Natural hairs have a cuticle that hang onto powders really well, whereas the synthetic brush is more solid and therefore easier to control those wetter products.
The sponge: Always make sure that if you are using sponges in your kit, they are disposable. With the growth and popularity of the beauty blender, it seems we have forgotten that this wonderful product is absolutely NOT sanitary to be using on several people. Many people will claim that you are able to clean the sponge out, however in my experience it is best never to risk it. Keep the beauty blenders as a personal tool. Not to mention in our local community of York Region, it is actually against health Canada policy to re-use a sponge (this rule can be found under the “spa/tools” category). Imagine having your business shut down by the government just for using a cute little pink sponge! not cool.
Cleaning:
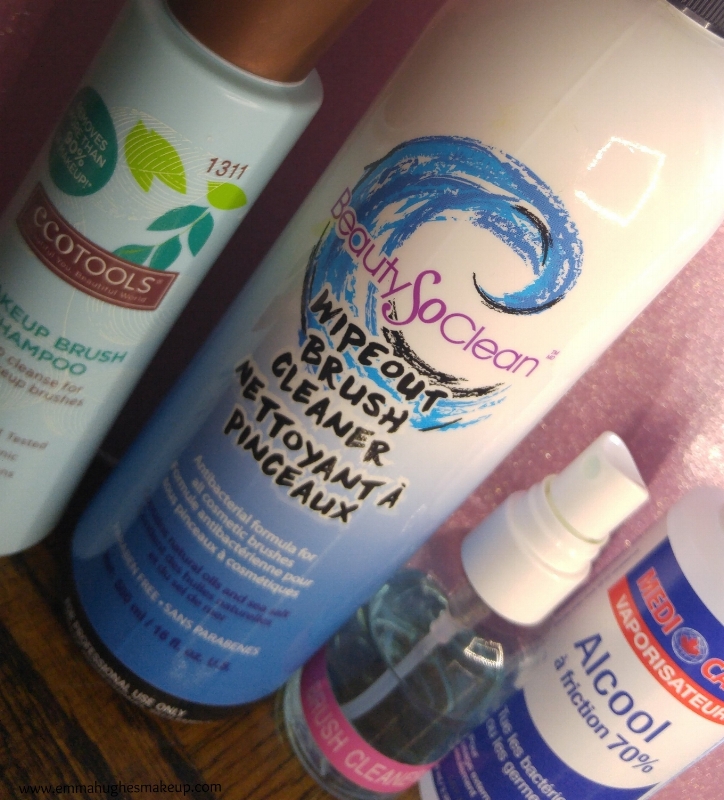
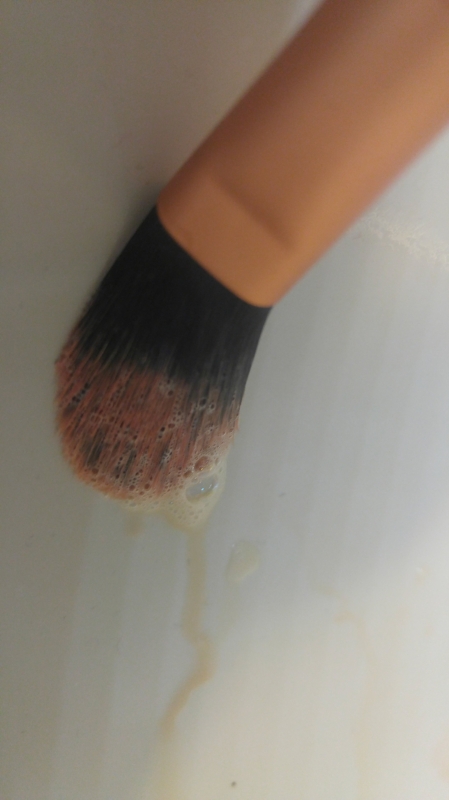
The spot clean: Spot cleaning your brushes is vital during your makeovers. Each brush that you use should be completely cleaned and sanitized between clients. It is also recommended to spot clean your brushes after your appointment and before replacing them into your kit for storage. How do you spot clean? well its simple, but doing it properly is important! What you want to use is paper towel, avoid kleenex or tissue that is thin as it will pill and create a giant mess. You should be using a high quality brush quality such as Beauty So Clean Wipeout, Cinema Secrets, or any of the many other options that are out there. Avoid brush cleaners that have a high content of citrus scent, as the citrus acids in the brush cleaner can dissolve the glue over time. Take your brush and hold it upright against the paper towel, spray once with your brush cleaner, flip the brush over and spray again. Then lightly run the brush downwards against the paper towel in an upwards/downwards motion, not in a circular rough and uncontrolled mess. Keep doing this until the brush runs clean of any colour. After the colour is gone from the brush, take 70% alcohol and spray the tips of the bristles liberally, and wash it against the paper towel and let it air dry. The alcohol step is important to kill any bacteria, however you want to be careful that you dont get it too close to the ferrule of the brush as the water content in the alcohol may ruin the brush over time.
The Deep Clean: Once you are home from your appointments its important that your brushes are deep cleaned to ensure they are properly disinfected. This is where an actual brush shampoo comes into play. I like to use Ecotools or BeautyBlender soap. Another favourite in the industry is Blue Dawn (the original dish soap) This is highly debated as to whether or not it is safe for brushes, so use it carefully. what you want to do is carefully soap and rinse the brushes while being very diligent not to get too much water up near the ferrule and handle. Make sure your brush is properly rinsed of all the suds and is the water is running clear before you decide to put it aside to dry. Keep in mind that some new brushes will have a dye on the hairs that will run the first few times you wash it, so if your nice new brush starts running the water black - not to worry ! that should stop happening after the first few washes. When drying your brushes, its important to dry them as upside down as you possibly can. There are many drying racks on the market these days that can help out with that. I also devised this handy device out of some local dollar store items to help me keep my brushes upside down while they dry. This of course is to make sure the water doesn't get into the ferrule. Once the brushes are dry its a good idea to give them a spray of 70% alcohol before storing them for good measure.
Tips for the working artist:
- Use disposables whenever you can, I love using wedge sponges for applying foundation, they give a great finish and you simply throw them away after. Of course every working artist should always have things like mascara spoolies, and lip wands in their kit. These little gems can be used for tons of other things besides their original intended use. For example i love to use a spoolie to brush out the brows, remove glitter, and soften any dead skin off the lips. The great part about disposables is that you throw them away after and don't have to worry about sanitizing them. they just disappear!
- Stock your kit with tons of brushes! I always need to know how many faces i will be doing before i go off to a shoot, that way i can stock my kit with the appropriate amount of brushes per each model, and move onto the next face without needing to clean anything. For example if I am working on two models I stock two of every type of brush.
- work with some type of system so you can differentiate between clean and dirty. I love using my Dany Pouch from Make Up For Ever to do this, one side is clean brushes and once they are used they go into the other side. Simple and easy!